Tag Archives: metal

The Middleman

#Art I made with #Midjourney #AI

Beware Google’s AI answers

So, I bought a Synology Network Attached Storage RAID and I was setting it up.  The hard drives were making a rhythmic thumping noise for some reason.  I suspected it may have been because I upgraded the RAM from 4GB to 32GB.  I typed the following into Google to search and see if anyone else had a similar issue:

“Sunology DS1821+ drives thumping like heartbeat with RAM upgrade”

The first response was Google’s AI that said something like “The reason Synology DS1821+ drives thump like a heartbeat when you upgrade the RAM is… (blah, blah, blah something ridiculous that is obviously incorrect if you know anything about computers.)”

The problem was that the AI took what I wrote and assumed it was true.  I didn’t know if it was true.  I was searching google to find out.  Nothing turned up in the search and after a few tests on the hardware, I found that the RAM upgrade wasn’t the issue.

Be careful with AI.  It makes assumptions.  In this case it was easy to spot, next time who knows.  Double check everything it says.

We Are the Dreamers of the Dream (sky grid update)

After my first experience making a puzzle I decided to update the artwork before printing another test puzzle.  I always thought the sky was a little plain in this piece especially since the sky reflected in the chrome sphere has a planet and clouds.  The plain blue at the top was also more difficult to piece together as a puzzle.  To give it some detail I decided to put a grid across the entire sky.  I think thematically this new grid shows that the image reflected in the sphere is actually a future dream.  The actual metaverse environment isn’t built yet.

I actually went all the way back into DAZ Studio to place the grid in 3D space and re-render the entire scene from the beginning.  I also took the chance to re-adjust the camera slightly to give more room around the edge of the frame for print bleed.  Final color correction is also slightly different.  If you’re re-doing it anyway, why not fix the things that bug you?

I also took the opportunity to fix another problem that I previously didn’t know how to fix and which has driven me insane since I first rendered the image.  In the original you’ll notice that the left armpit of her “space samurai” outfit is screwed up.

That’s because the clothing mesh is getting confused between the arm and the torso which are colliding.  I was able to grab the clothing mesh with a DAZ Studio plugin and pull it back toward the torso.  I actually had to stretch it quite a ways into the center of the character like a rubber band to get this small area to look better.

These changes were relatively small but I think they make a big difference.  Can’t wait to see this new version printed out.

Created in DAZ Studio 4.22
Rendered with Iray
Color Correction in Capture One

Is Electronic Love to Blame? (16×9)

I’ve worked on this CGI scene longer than any other.  I’ve spent years obsessing about every detail.  I’m sure I’ve sucked the life out of it many times.  I hope there’s still something good left in it but I can’t tell anymore.  The only thing I can do is to let it go and put it out there hoping there’s still some life in it.

This is the second iteration of this piece.  The first one, which you can read all about here, was square, with a grey background, and a different dress.  I also added a pierced heart necklace to this new wide version.  Those are the big differences.  There are tons of other small changes.

So, why a new version?  Because I wasn’t satisfied with the old one.  (Actually I grew to hate it.)  For some reason this piece is an ongoing obsession.  Even now I’m looking at the image above and wondering if the background is too dark, contemplating changing it again before posting this blog post.  But I’m not going to.  I have to let this one go and be done with it.  Next step is to print it on metal like I’ve done with several of my other pieces and see how it comes out.  If it needs tweaking after that, then I will, but for now, it’s done!

Color correction this time is in Capture One.  I abandoned Lightroom a few years ago.  I’m not interested in paying a subscription for my professional software.  Buying a perpetual license for Capture One is actually more money but it’s worth it.  If at some point I decide I can’t afford to upgrade anymore I won’t lose access to all my images and all the work I’ve done on them.  Don’t ever let a company and their tools act as gatekeeper to your work.  — I’m also liking the color correction controls a bit better in Capture One, thought Lightroom wasn’t bad.

Created in DAZ Studio 4.22
Rendered with Iray
Color Correction in Capture One

Robot Romantic Getaway Goes Wrong

It’s not easy getting the art machine to do what you want. It’s like it has a mind of its own…

I’m trying to create a video with Stable Diffusion and Deforum.  Doing lots of experiments.  It’s becoming more and more clear that storytelling is next to impossible because there are just too many variables with AI art.  The machine is constantly throwing curve balls that derail the story.  The scene above was originally part of a Spaceship Hibernation story line.  It went something like this:

EXT. SPACE spaceship, stars, perhaps a nebula
INT. SHIP Wide shot, pipes, hibernation chambers
CU. Woman sleeping in a hibernation chamber
EXT. EARTH sunset, beautiful, idyllic
EXT. EARTH Woman and Man holding hands
EXT. EARTH sunset, man and woman kissing in love, sunset
EXT. SPACE spaceship flys into the distance

All kinds of things happened.  I couldn’t get the machine to give me a single spaceship in outer space.  At first there was a robot standing on the ground.  I tried a slew of negative prompts but always ended up with a fleet of ships, or planets, or no spaceship.

Also, the girl sleeping in the hibernation chamber always had her eyes opened.  Adjusting the prompt didn’t change this.

So I gave up on the spaceship-hibernation part of it and tried concentrating on the dream in the middle.  Still having trouble, but continuing with the tests.

#Art I made with #StableDiffusion #AI

White Ring

After creating my Red Ring CGI piece and having trouble with it being quite dim, I went back and changed a few things in the original project and re-rendered with a white ring of light.  I wanted this version to be different, not in silhouette, so I added an extra light to shine on the robot as well.

The robot is actually the same color as in the Red Ring image, except that I made the surface less glossy.  I also added a robot head with one circular eye.

Created in DAZ Studio 4.21
Rendered with Iray
Color Correction in Capture One

Successful Power Up

I wasn’t trying to make comic book art but that’s what the AI gave me.  This is one of the problems with AI art right now, so much of it is arbitrary.  You can get something pretty good but if you want any sort of control, it’s a roll of the dice.  Roll that dice a lot and you may get close.  This subject of this image is close to what I wanted but the style is not.  Here’s the exact prompt:

Massive machines build a beautiful metallic woman robot in a glass tube with men around controlling the machines, In the style of a 1930s SciFi pulp magazine cover, hyper detailed

It took over a hundred tries to get something close and then I did twenty more variations of this image which all came out essentially the same.  I just picked the best variation and here it is…

#Art I made with #Midjourney #AI

Red Ring

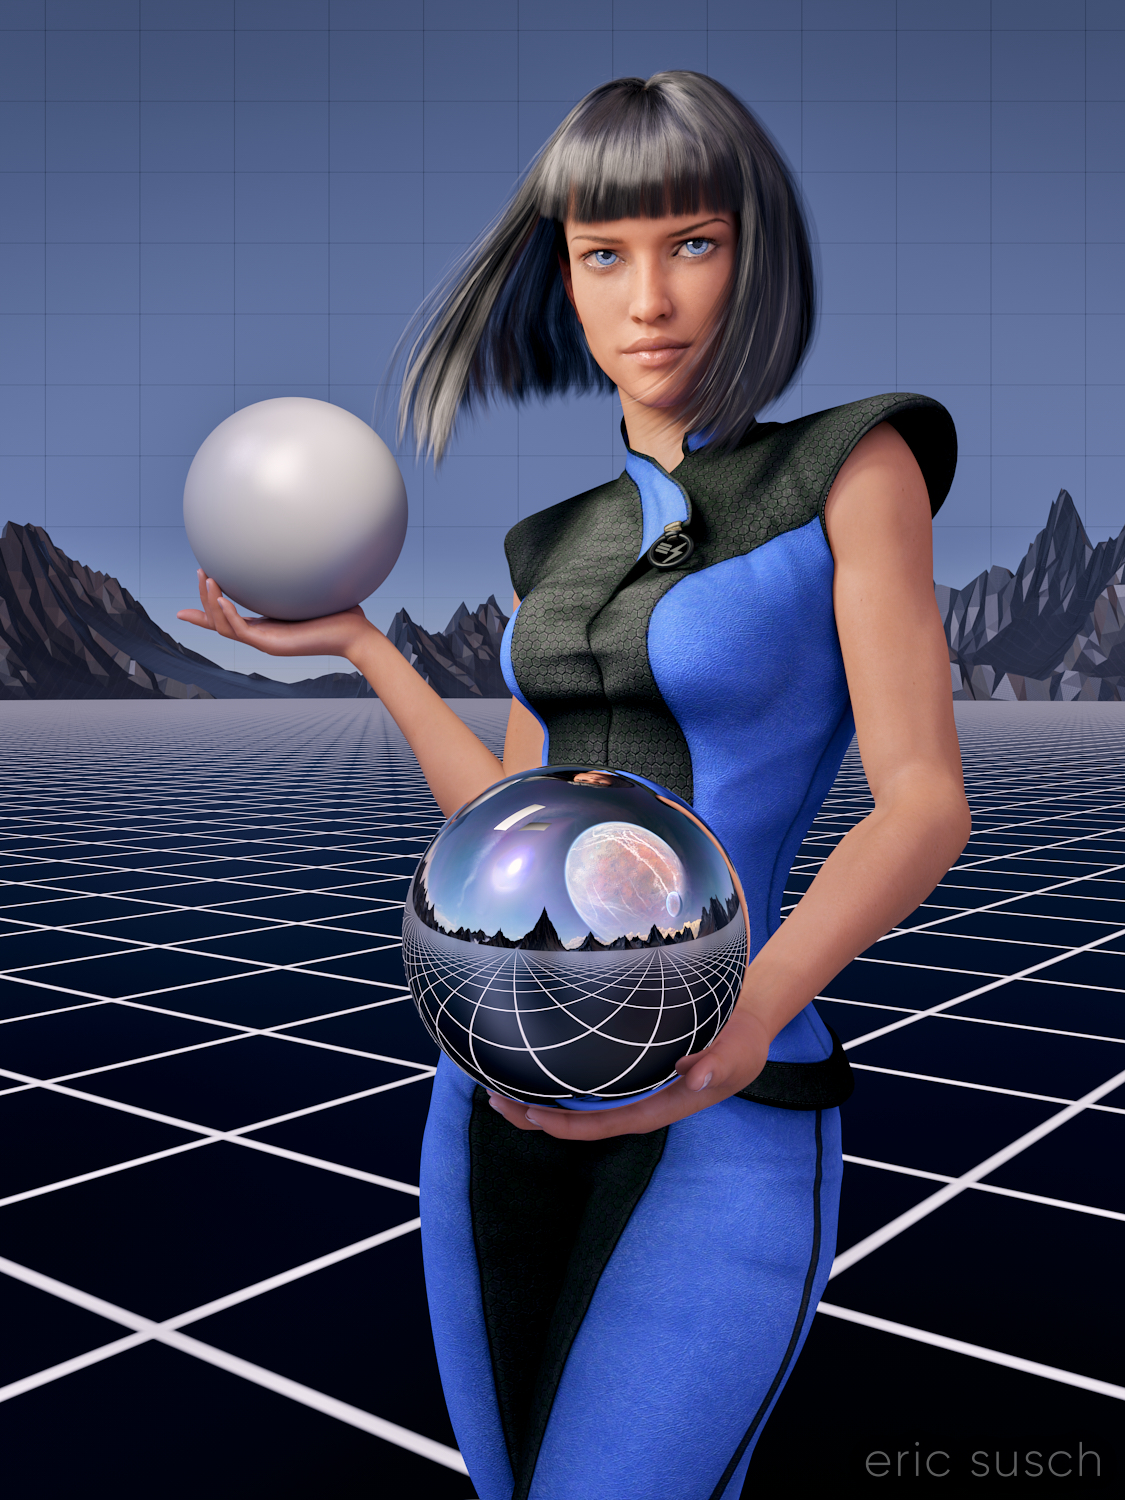
The vision in my head:

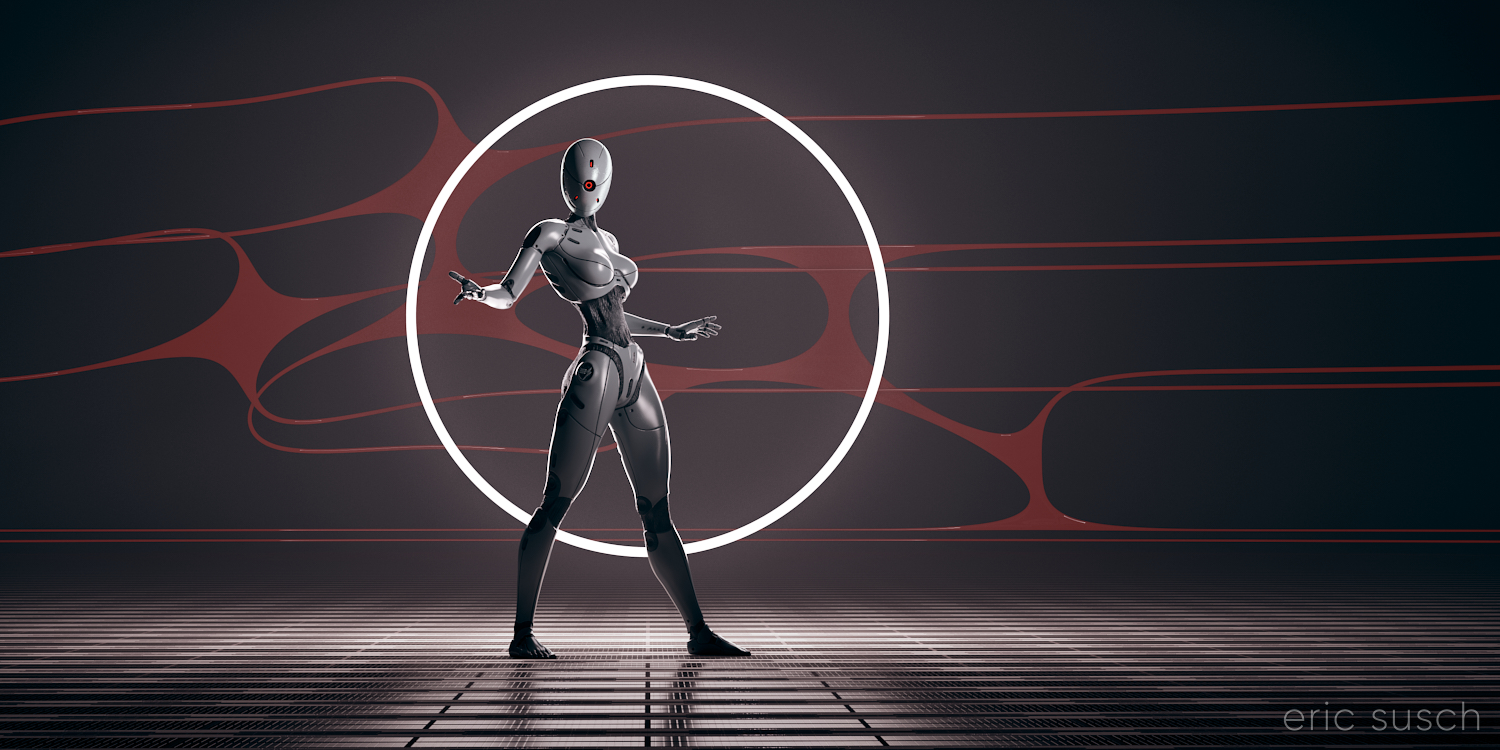
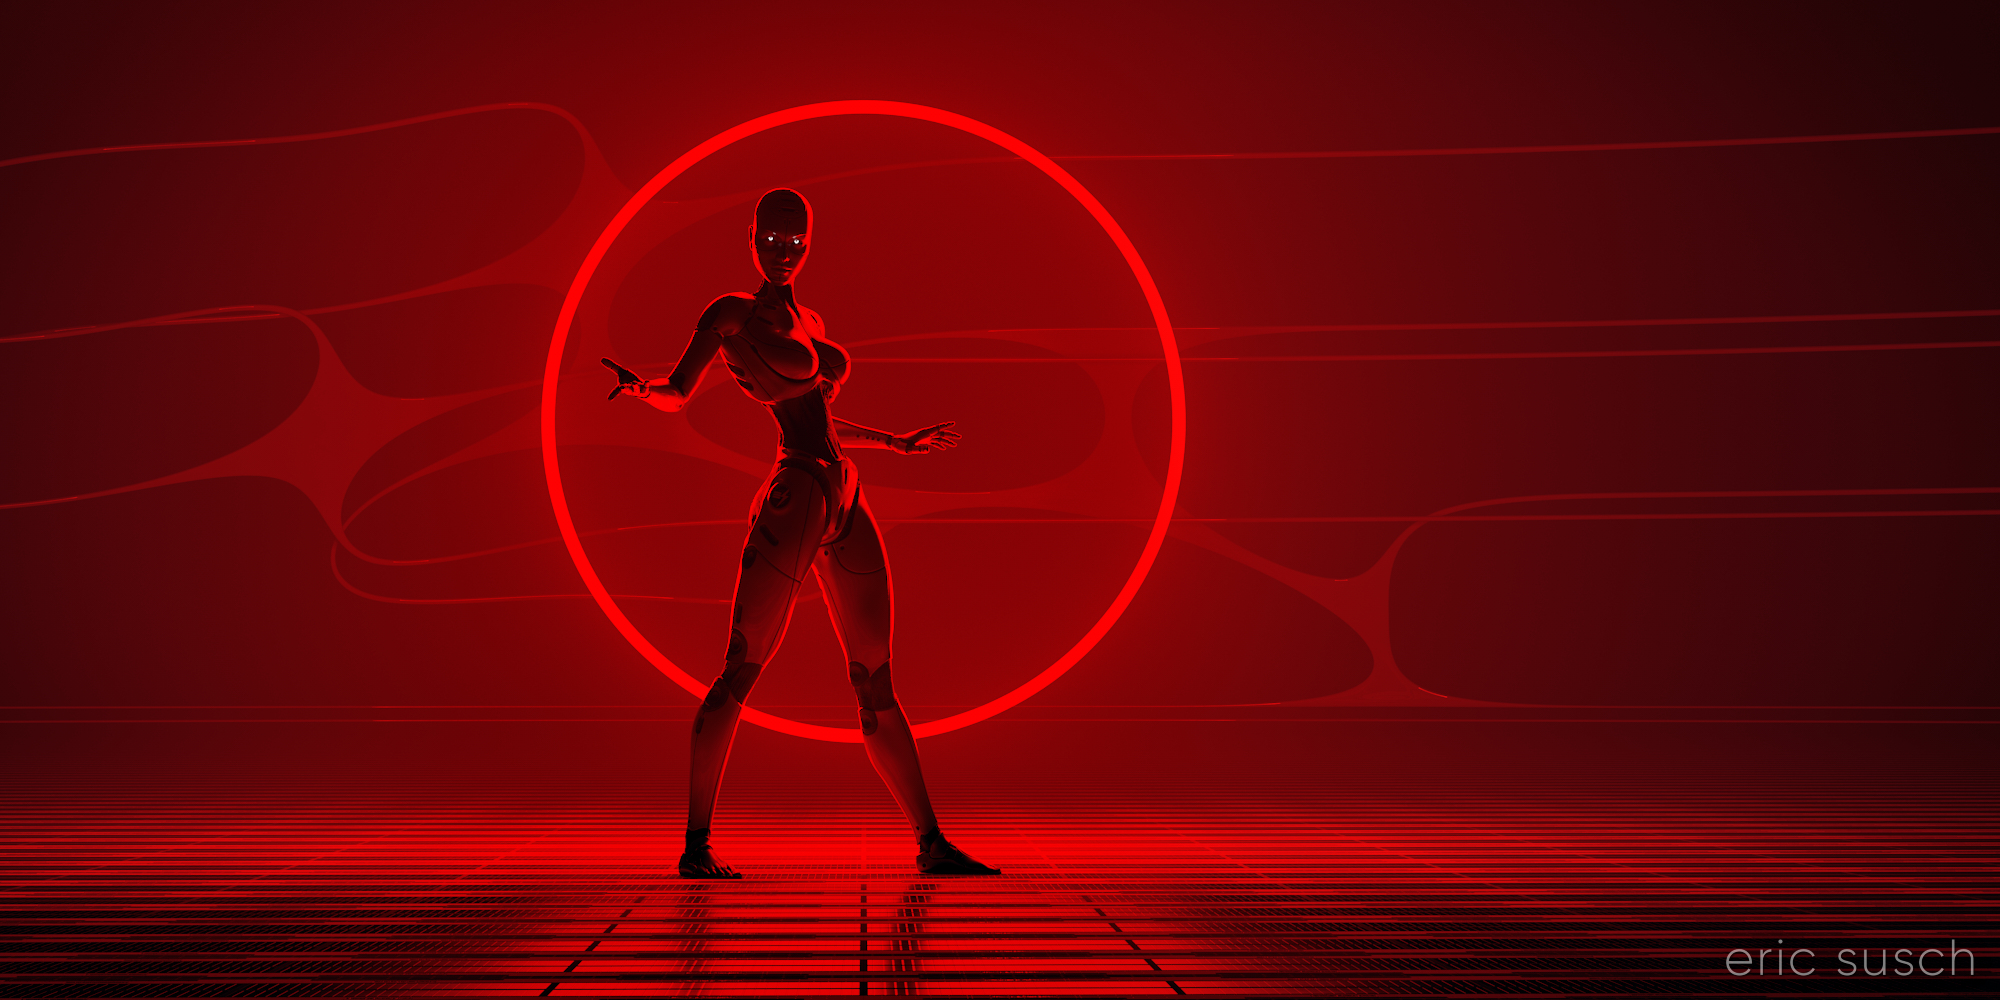
An intensely bright thin red ring light in the distance, a woman robot in silhouette, on an abstract shiny metal plate surface, hyper realistic, cinematic, dense atmosphere

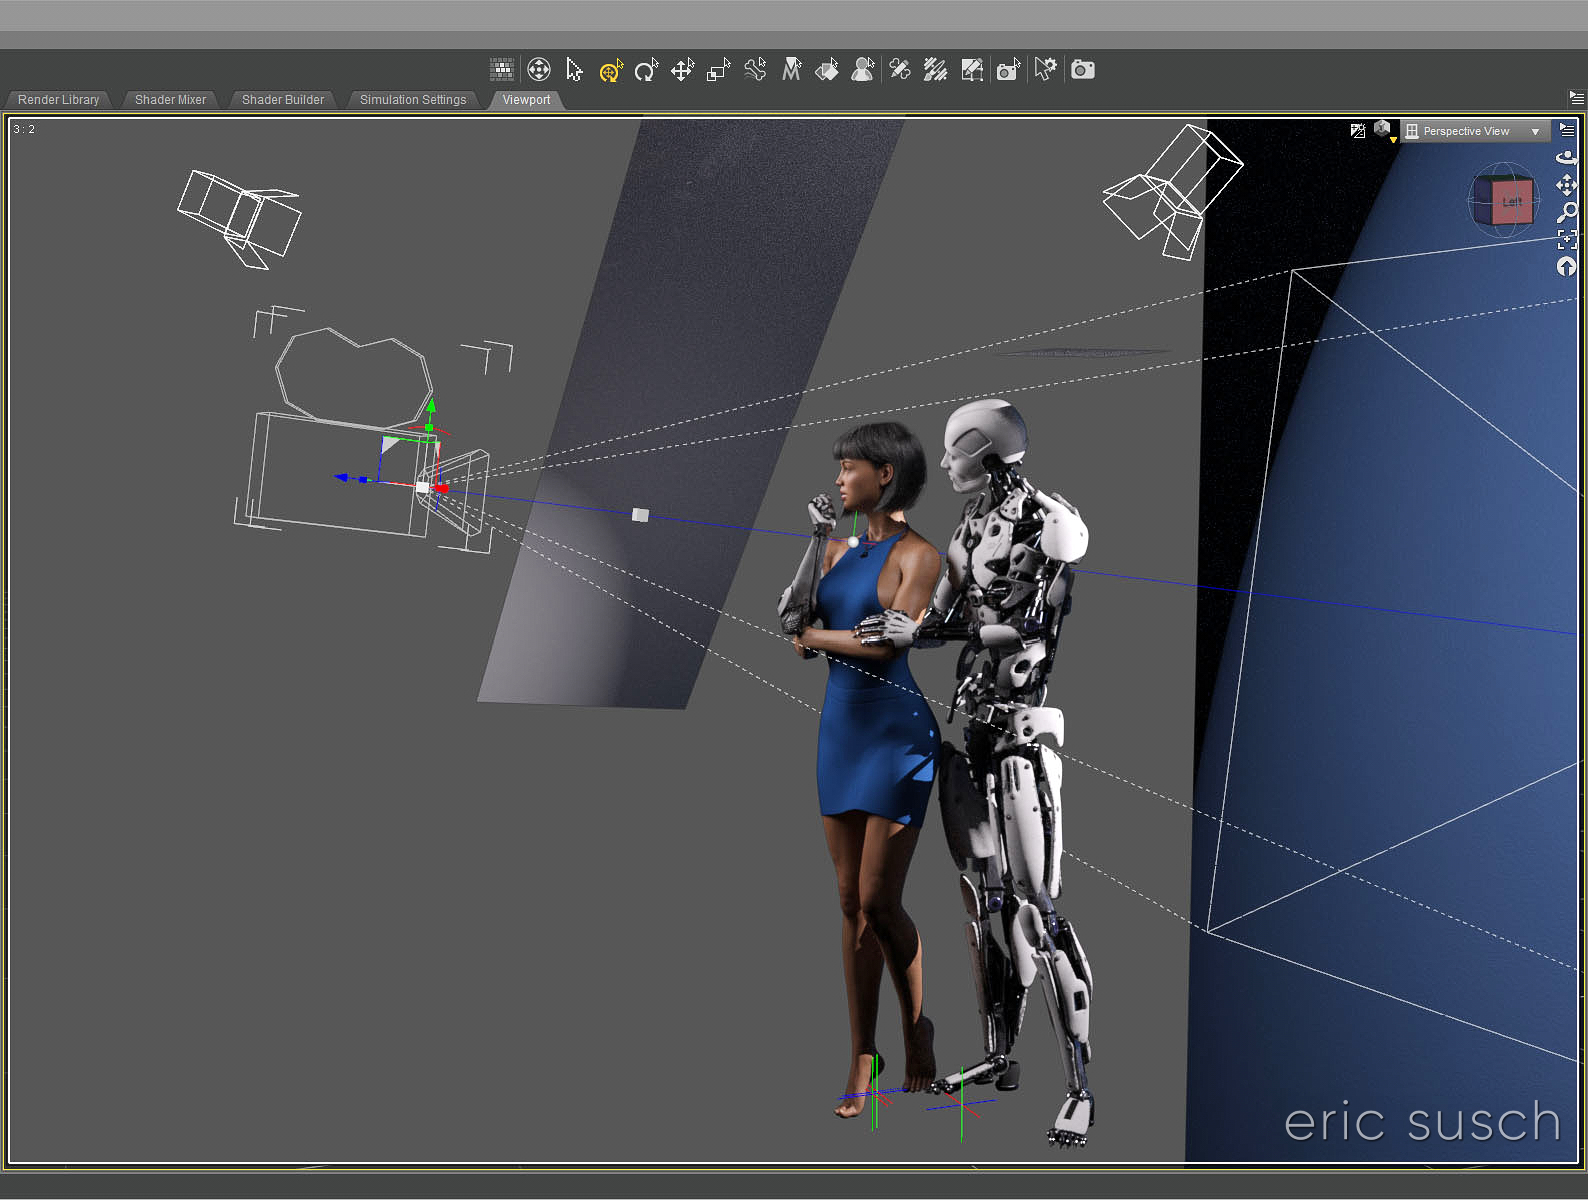
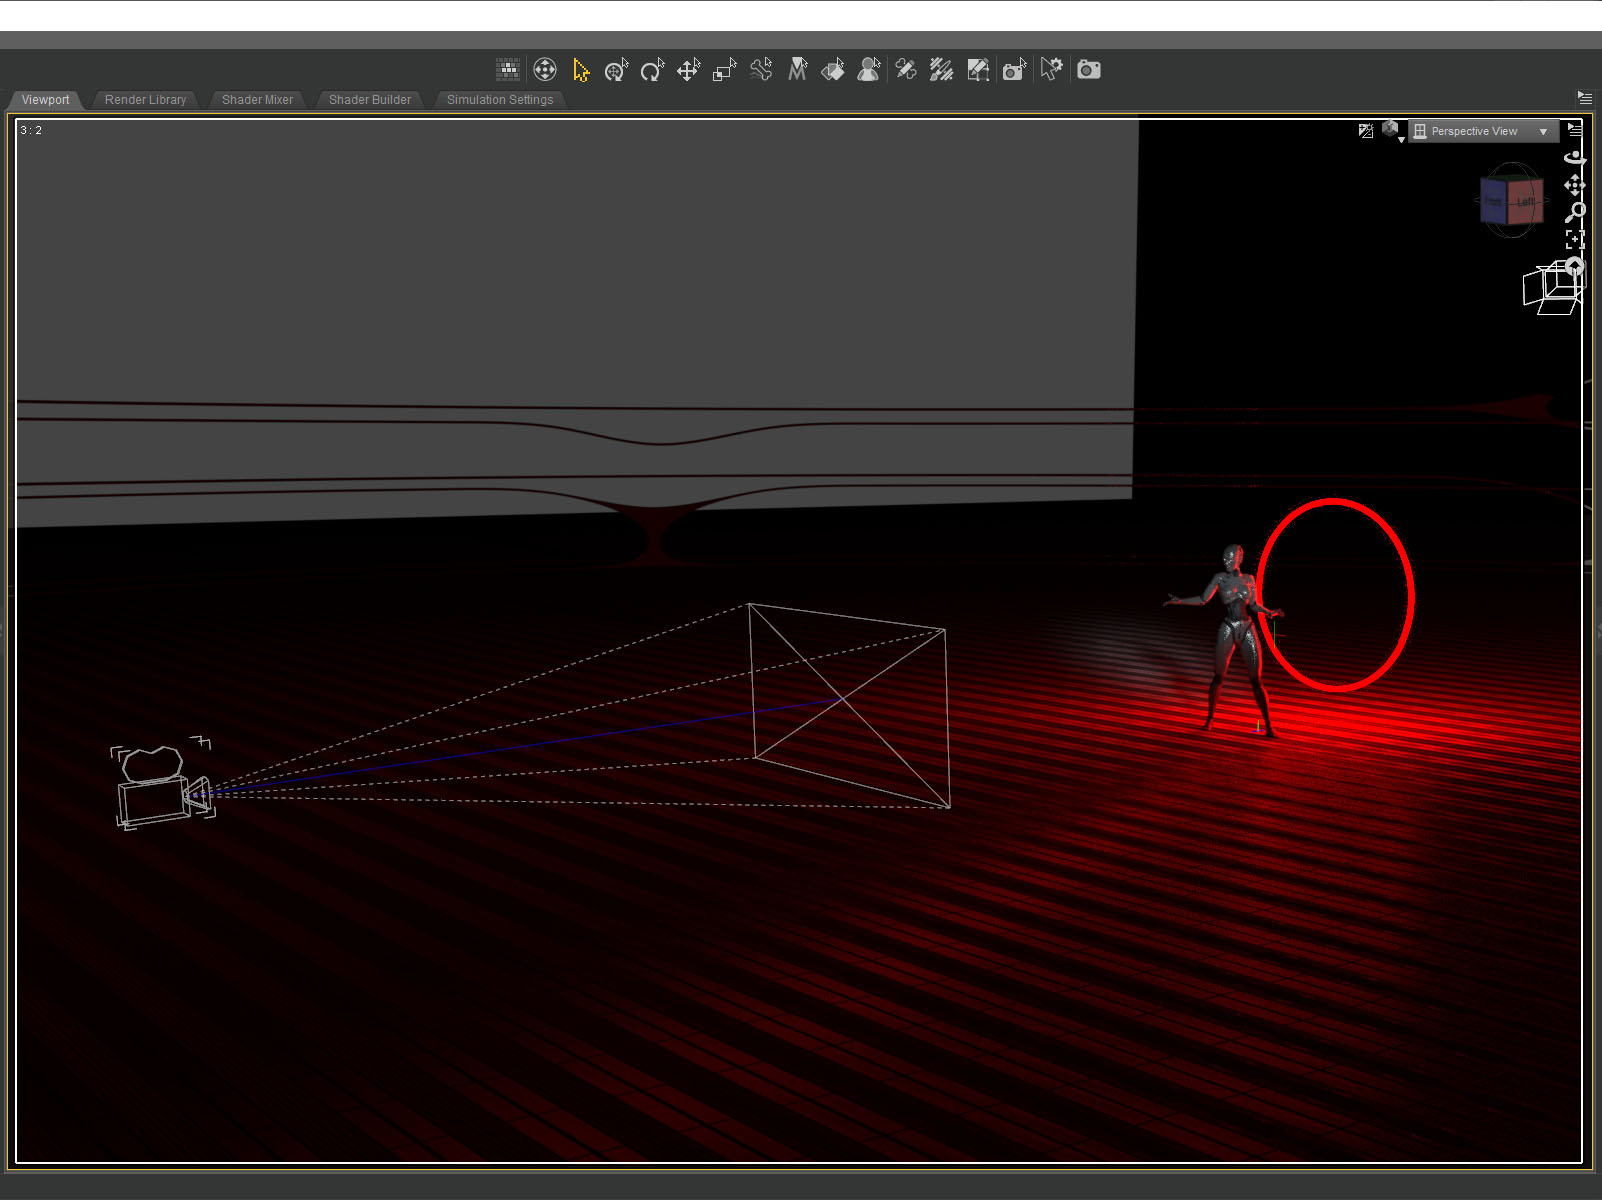
To manifest that vision I created a floor plane with a metal shader and another black plane as the backdrop.  A simple torus primitive served as the red ring light.

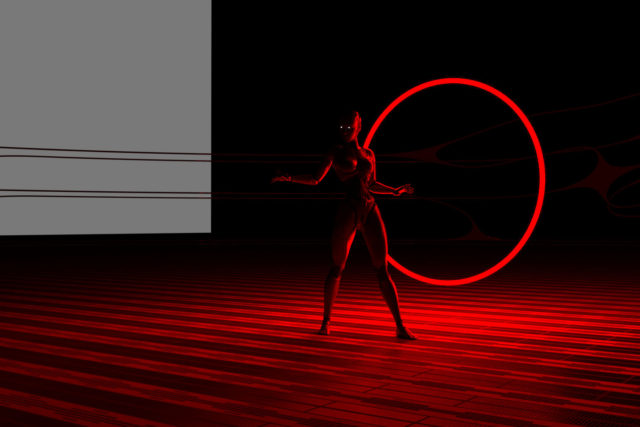
I wanted the red ring to frame the figure and at first I tried placing it way in the distance, but I found that it dipped below the floor plane and I wanted to see the full ring.  Moving it closer and scaling it down created the same composition with the added bonus of shining a strong rim light onto the robot figure.

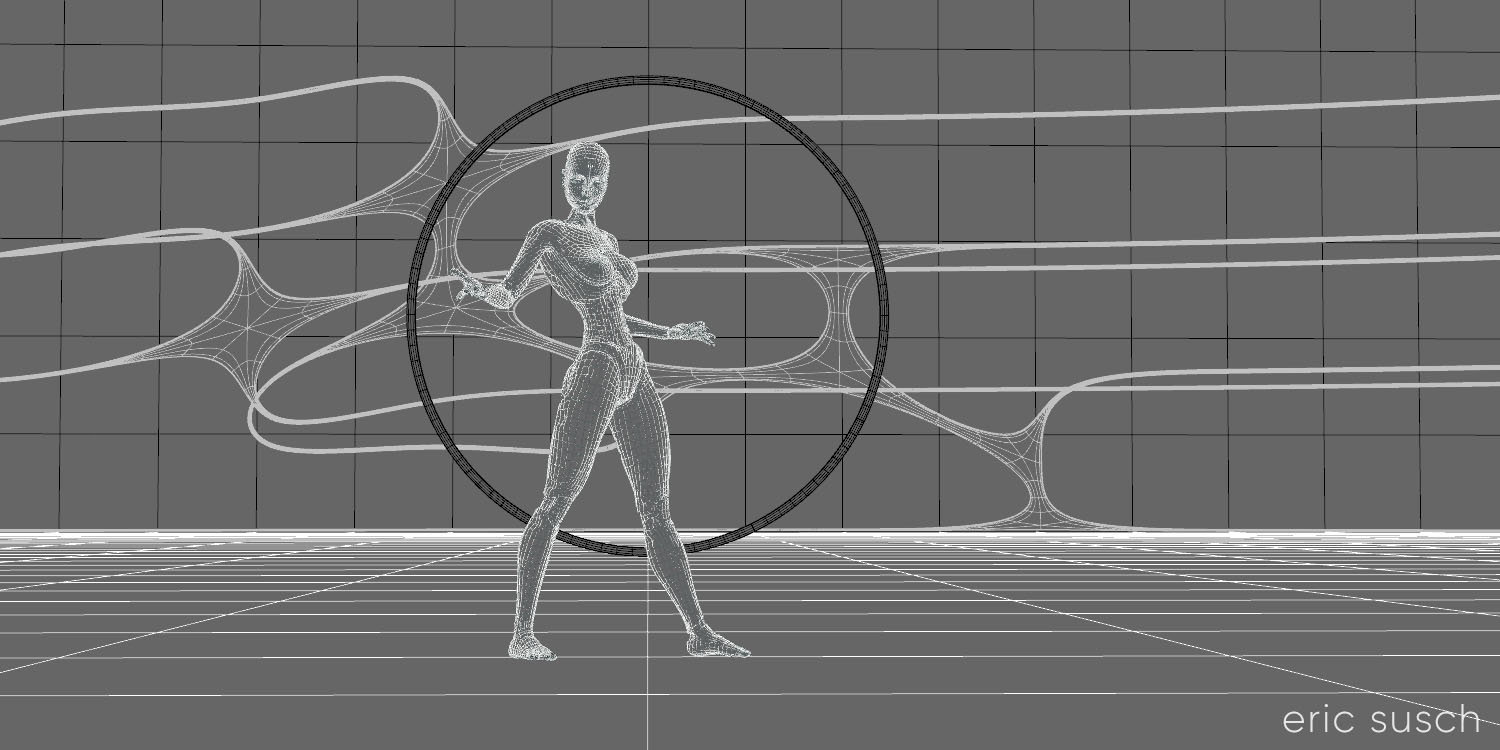
The shapes in the background are part of an abstract model that actually goes all the way around the landscape.  I found a part I liked and buried it in the fog to create a little texture in the background.

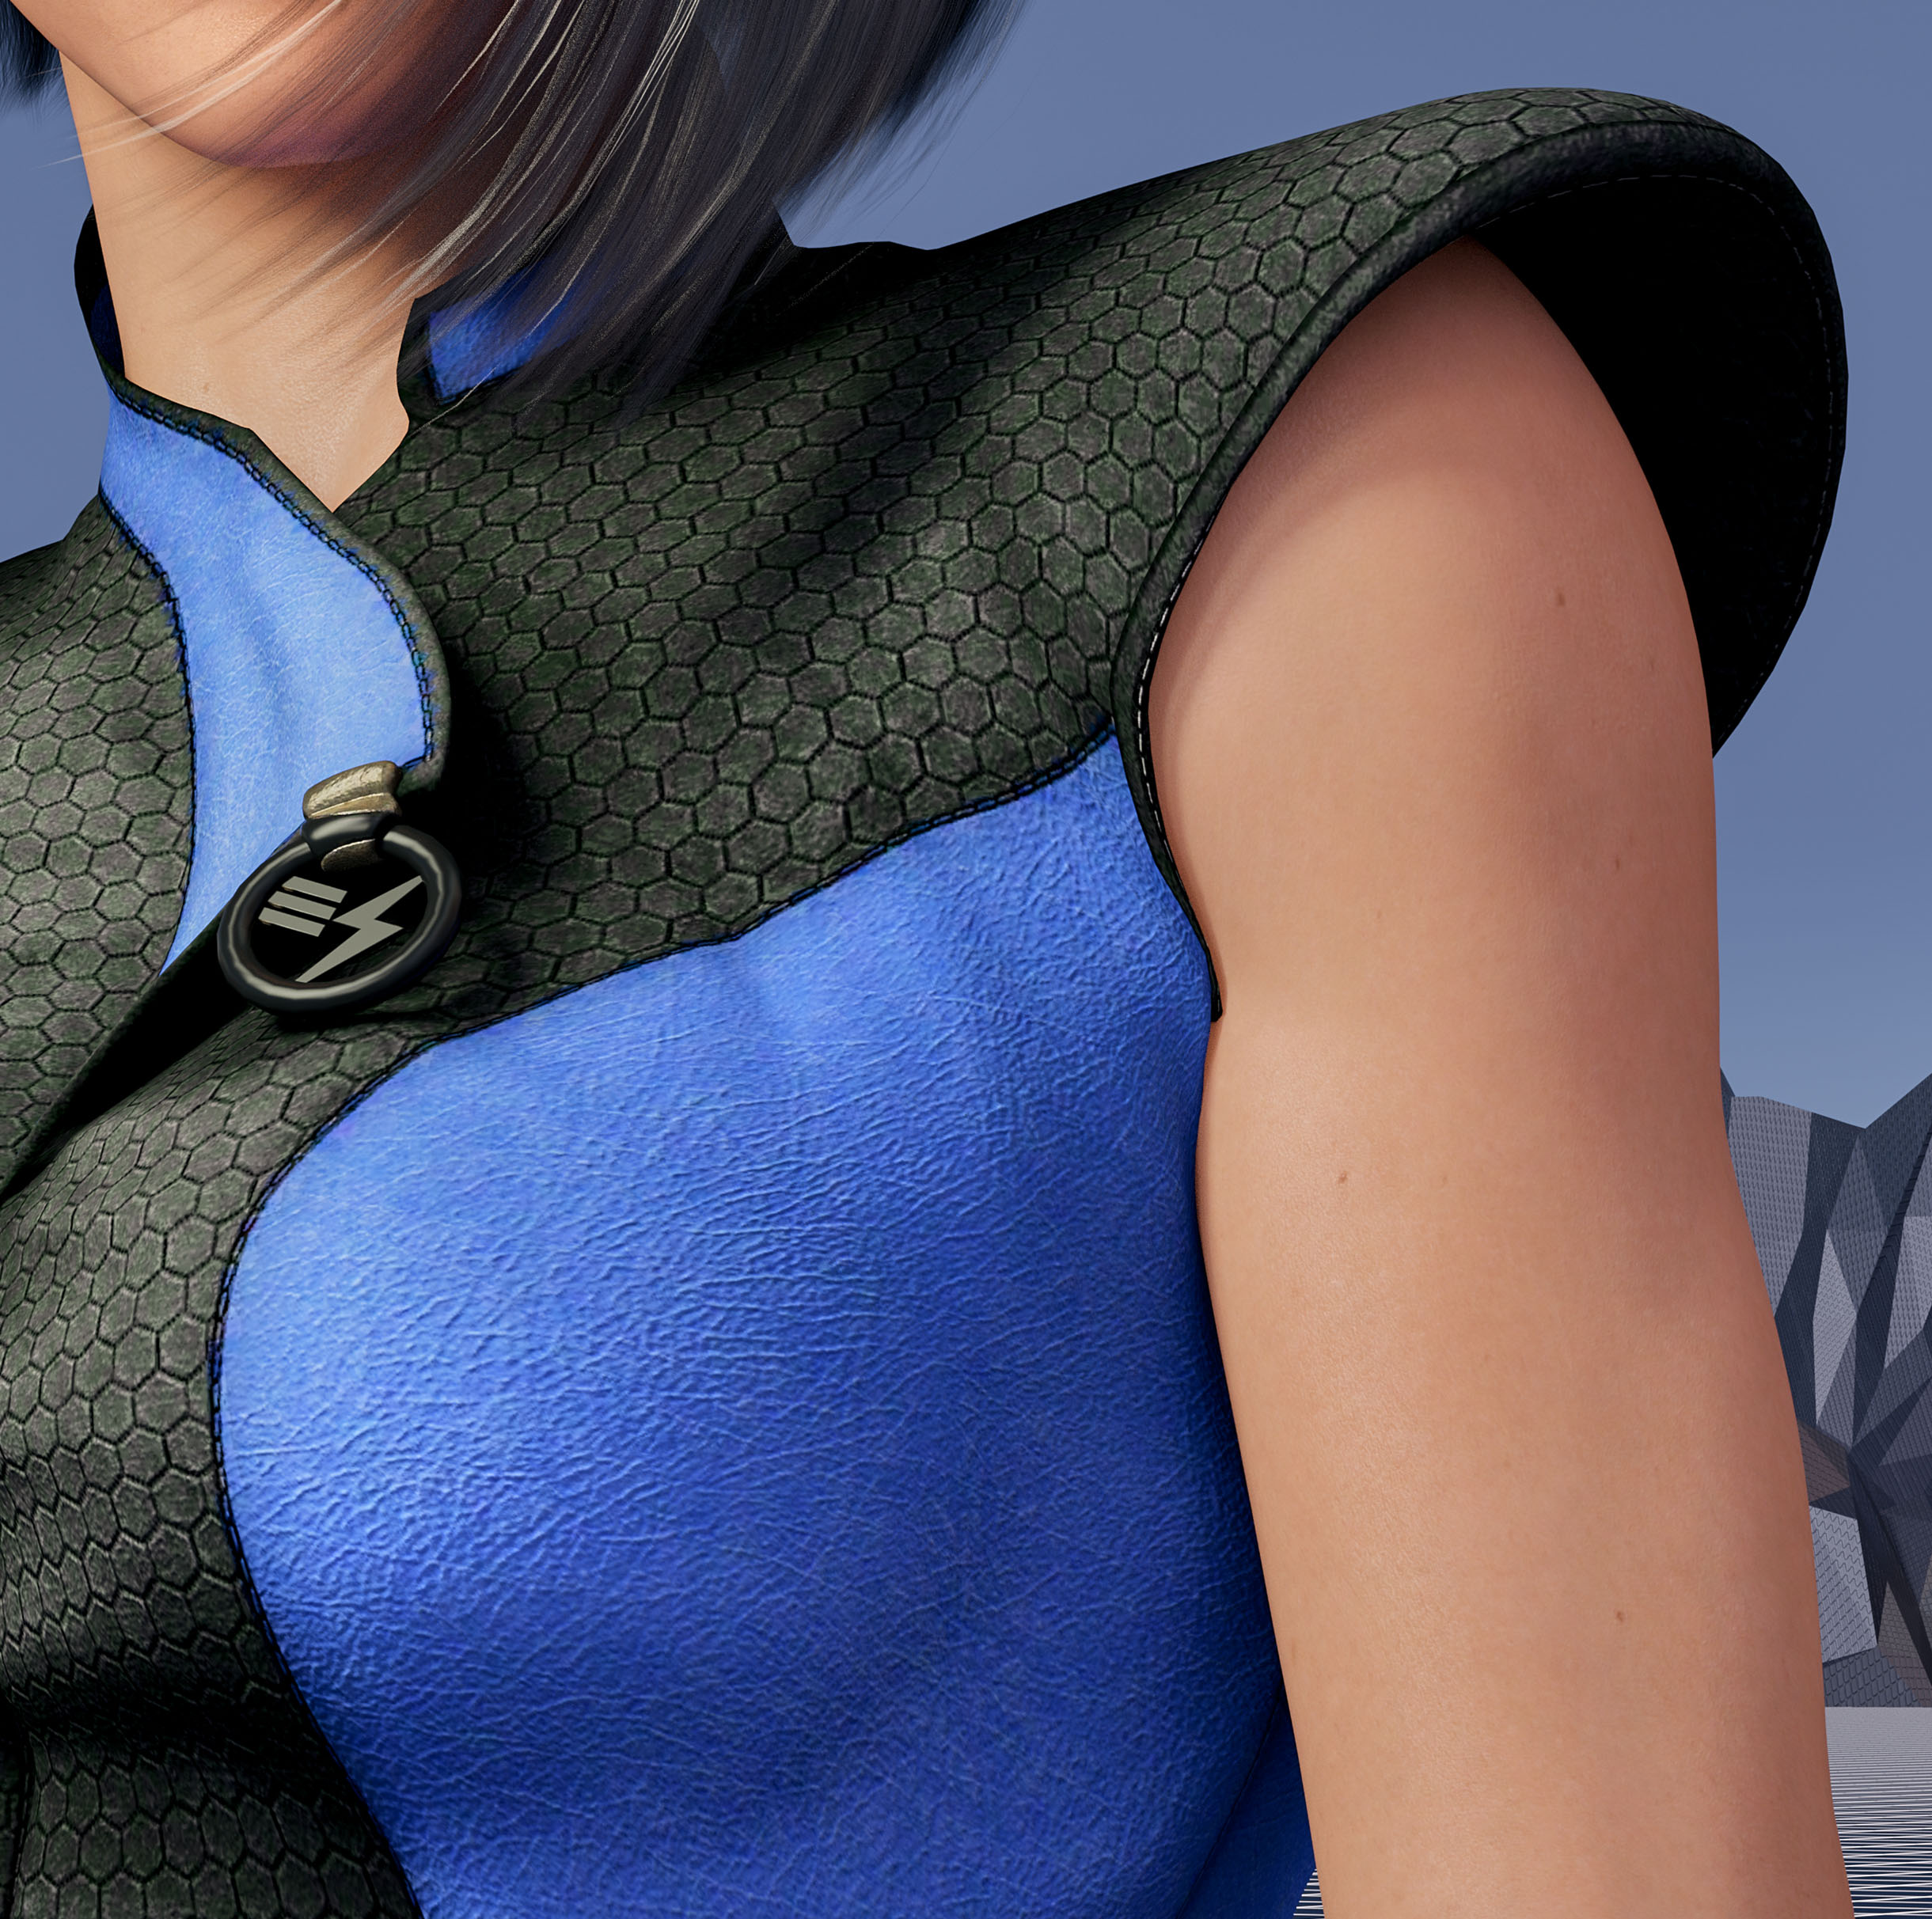
I spent quite some time adjusting the surfaces on the floor and the robot.  The entire scene is lit by the red ring.  The only other light is in the eyes.  The color and reflectivity of the surfaces really determined the quality of the image.  I wanted the floor to be shiny and reflective but not blown out.  I also wanted the robot to be in shadow.  A chrome or white surface didn’t work so the robot is actually shiny metallic dark grey and black.

Ultimately the original render was quite dark.  I felt the quality of the light was more important than the brightness.  I could always brighten it up later.

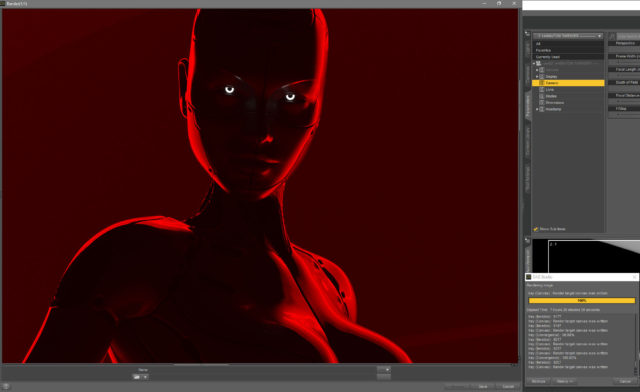
It took about seven and a half hours to render because of the fog and the dim light.  (Bright light renders a lot faster in Iray.)  I also rendered it at 14400 x 7200 so I could print it four feet wide and hang it on the wall if I really wanted to.  I’m crazy that way…

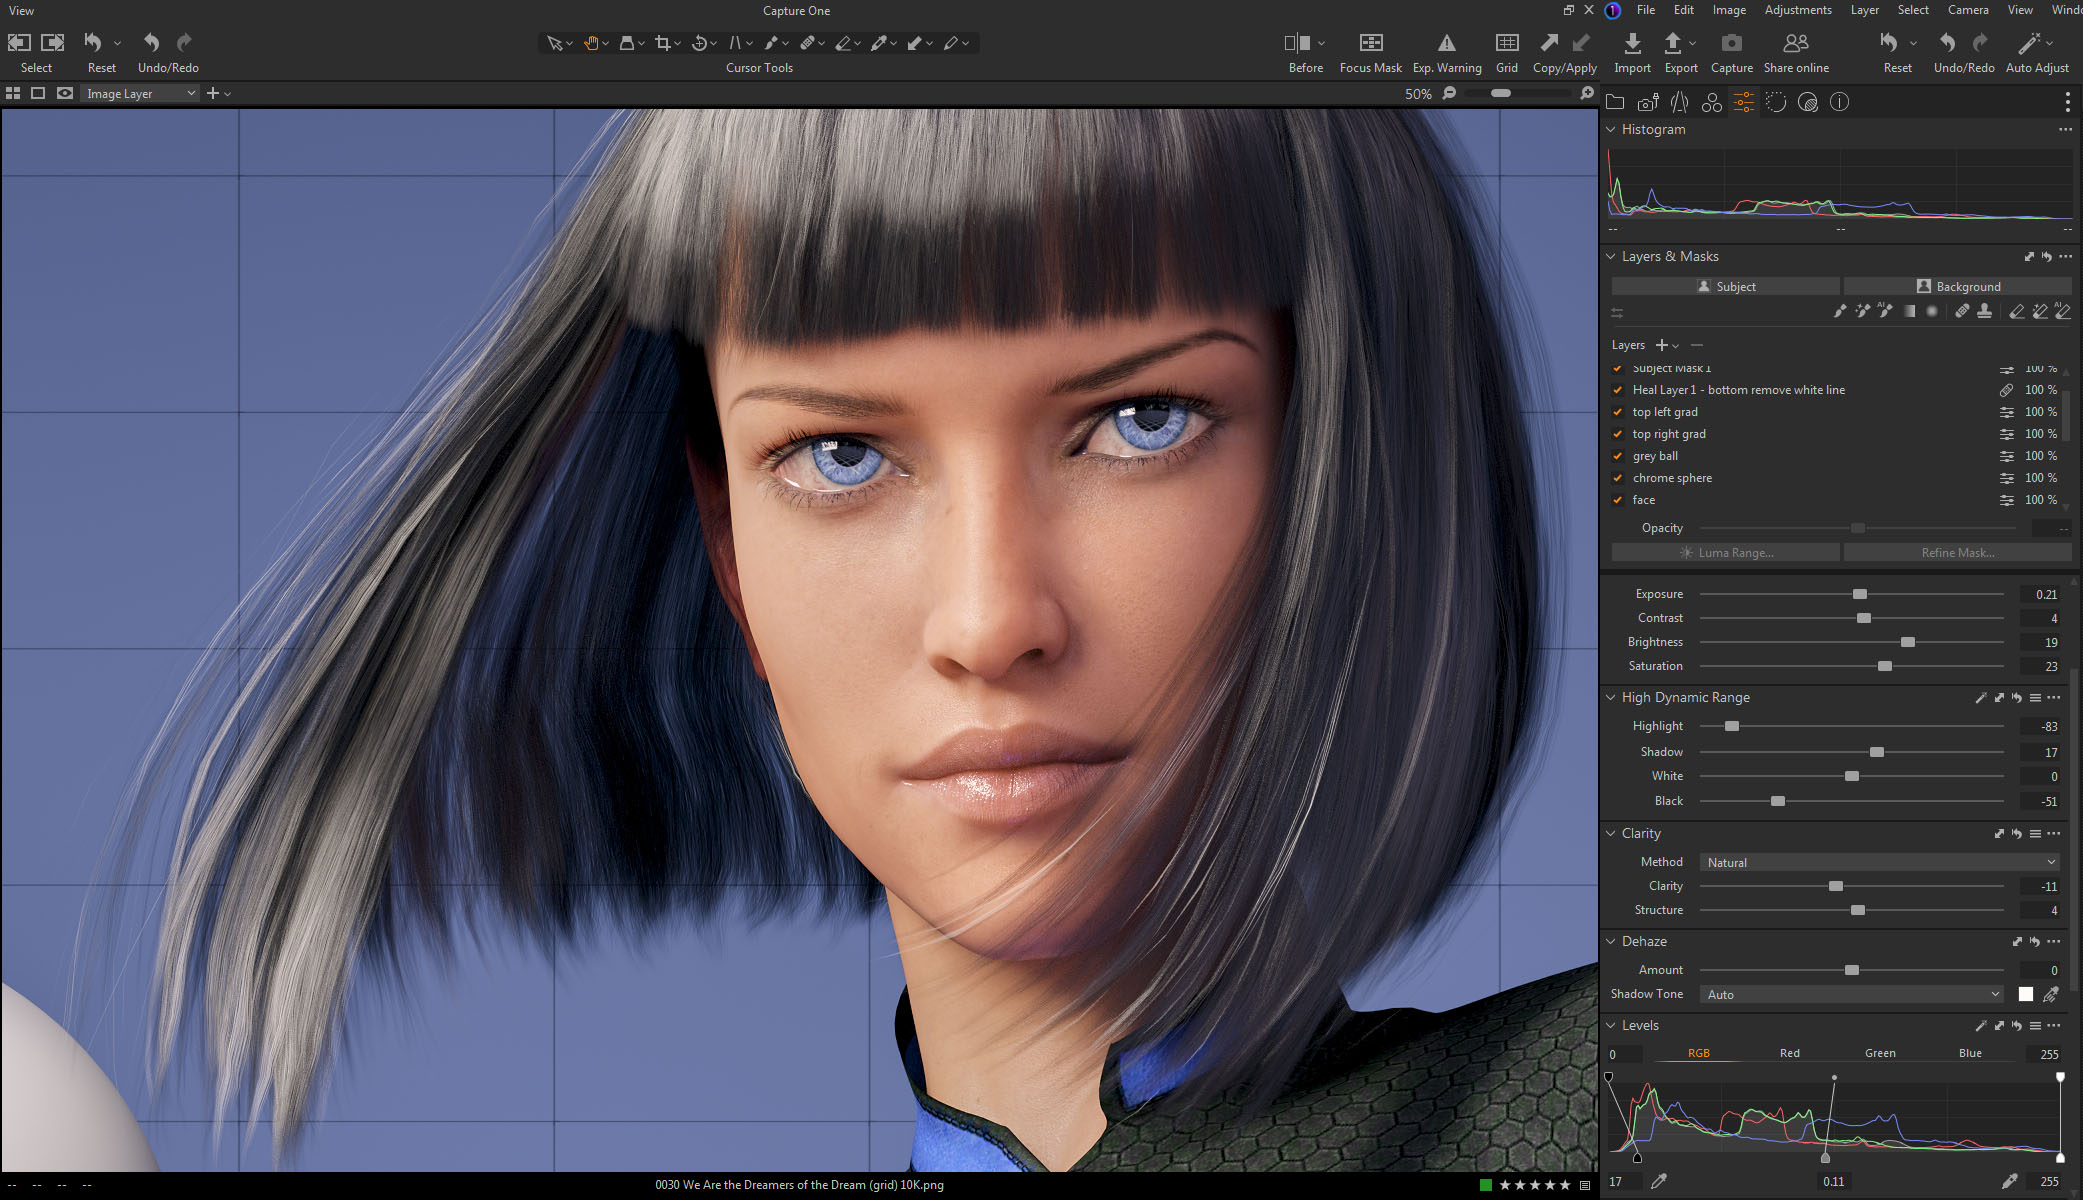
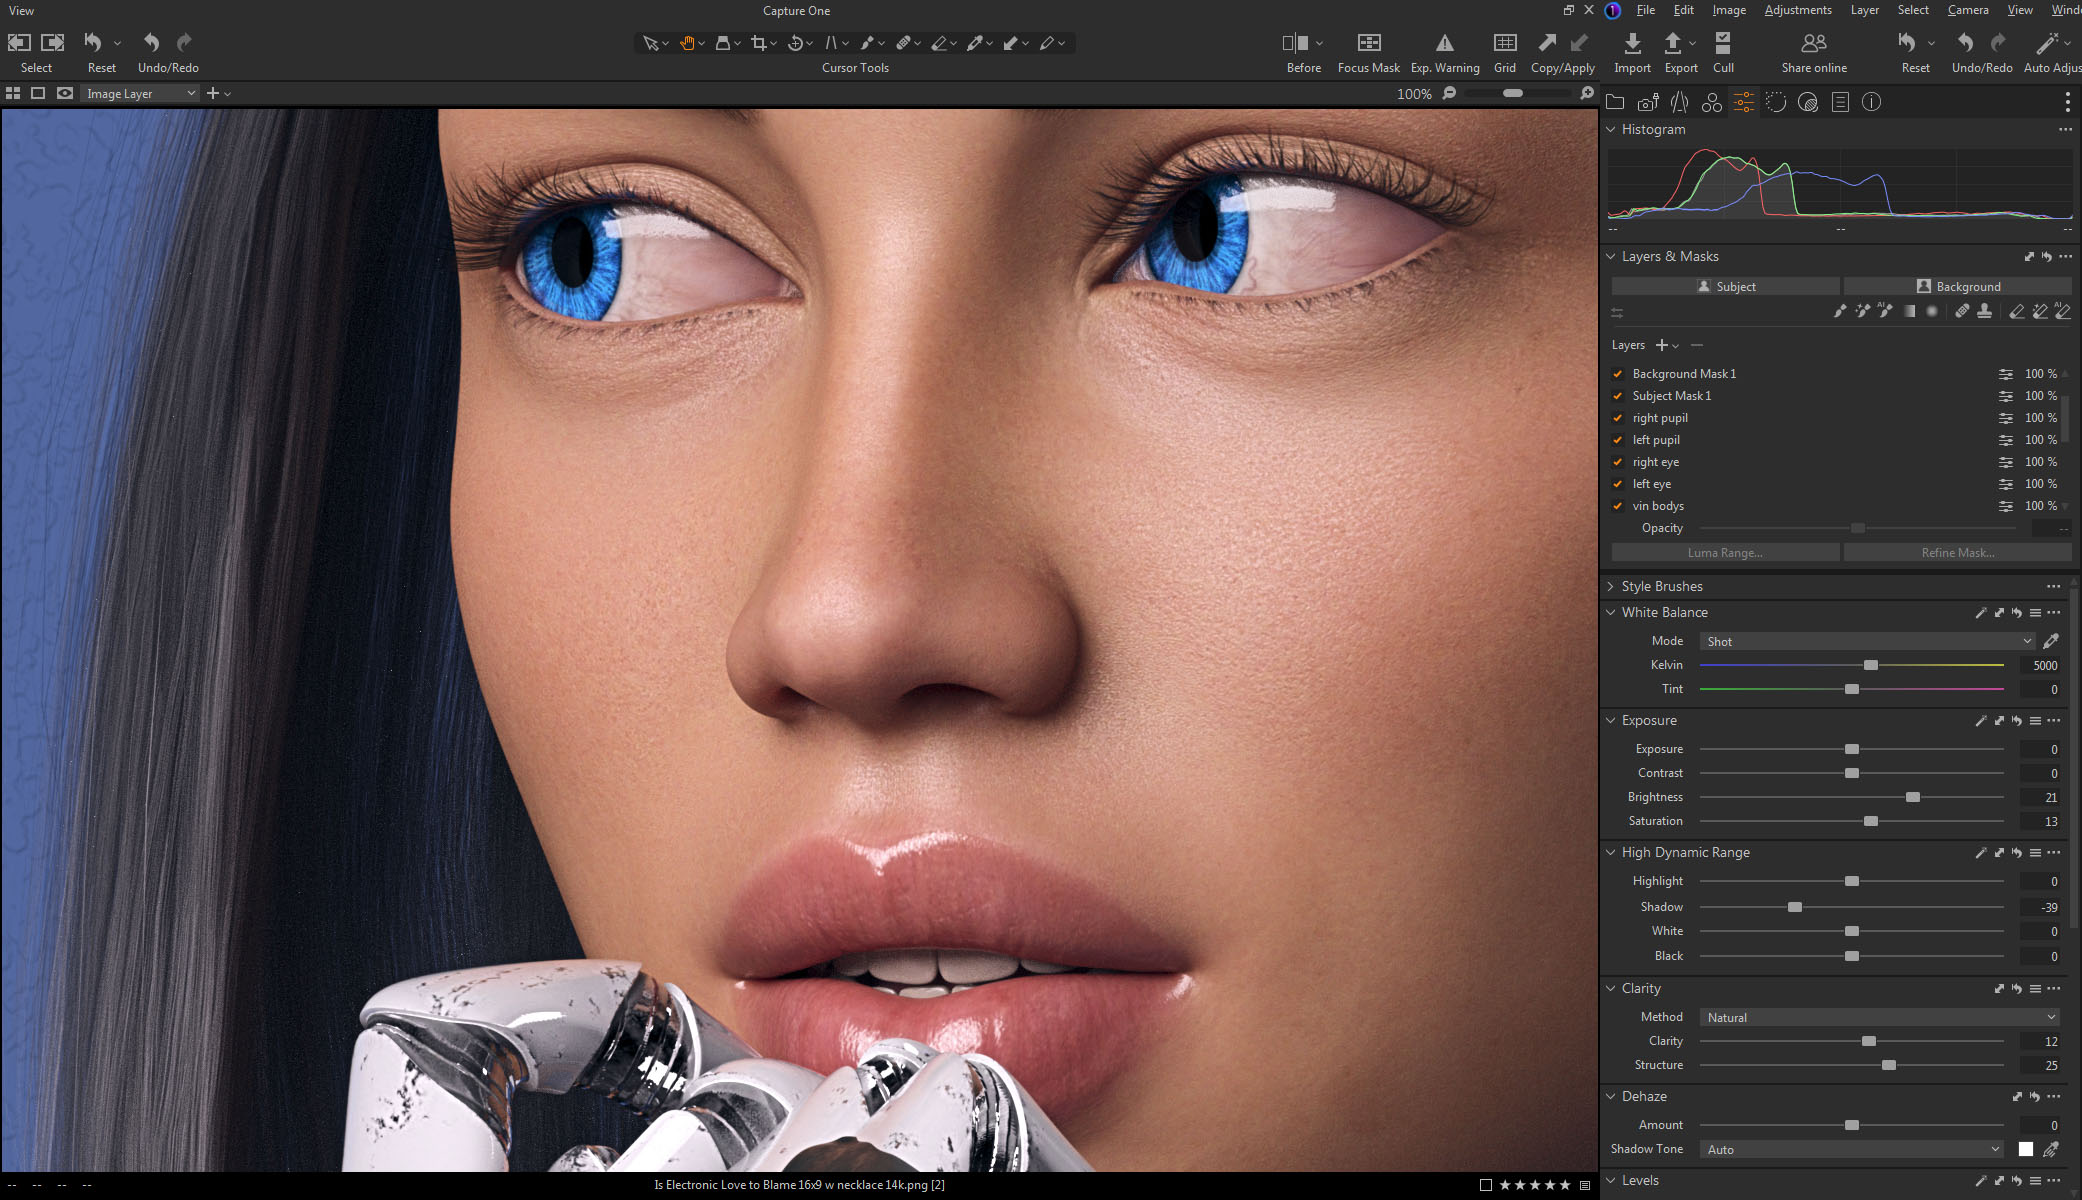
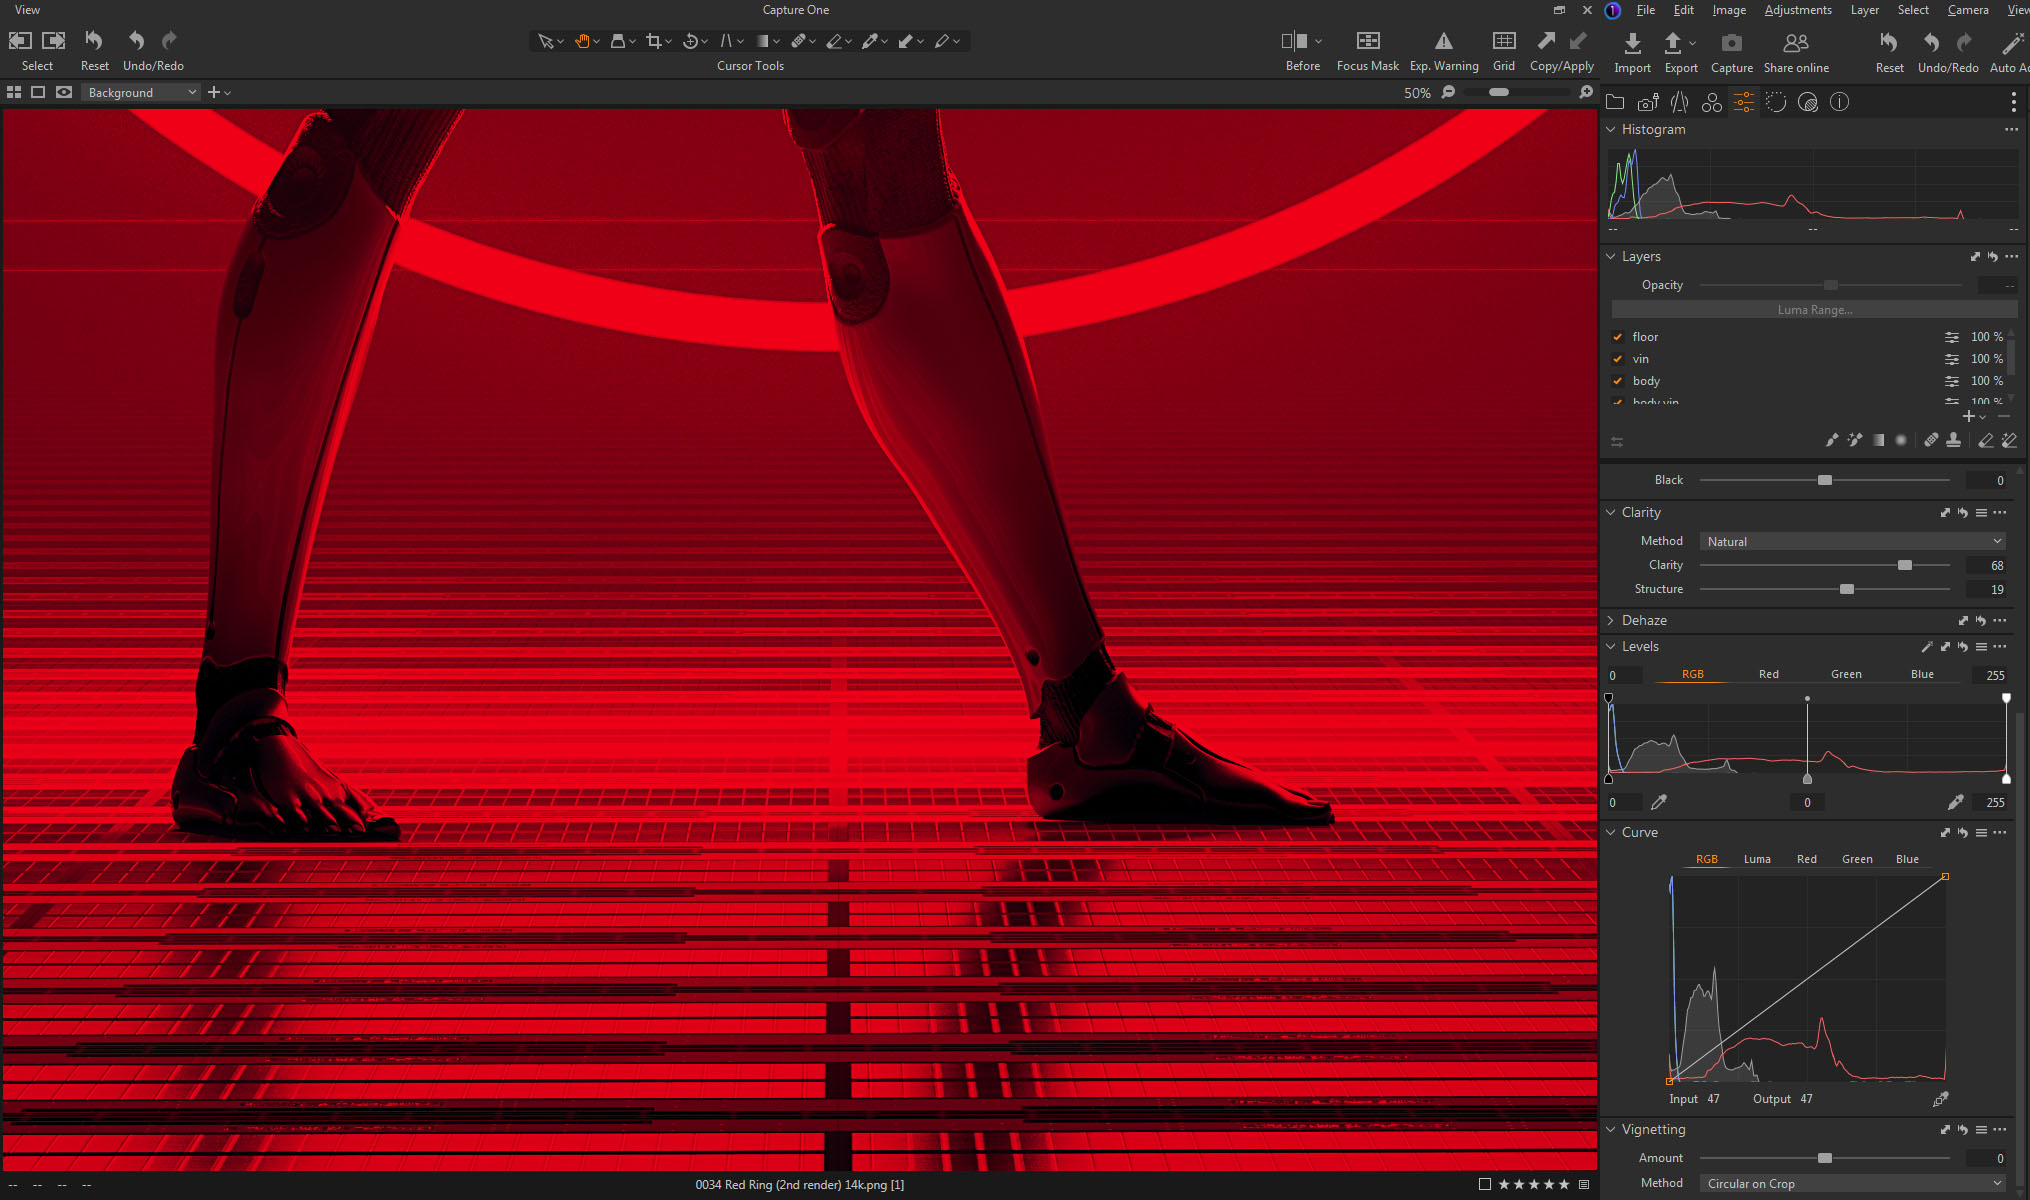
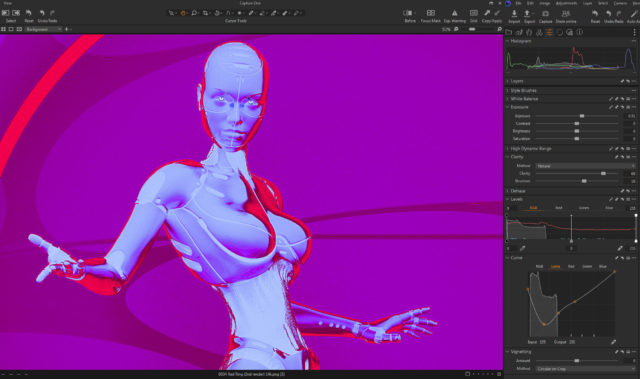
This screenshot shows the brightness of the original render just as it finished baking for seven hours.

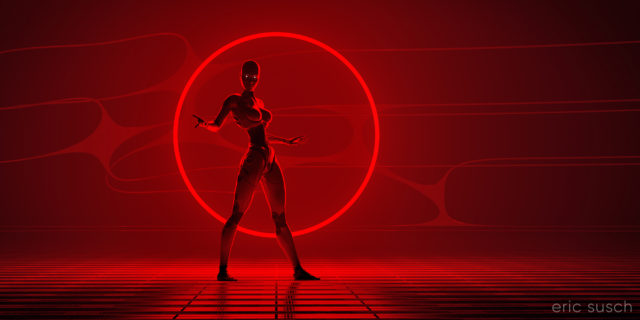
When color correcting I brought the brightness up quite a bit while trying to maintain the quality of the light. The problem was all the detail was in the red channel since all the light was pure red.  This left even a brightened image still dark.  This is all the brightness I could get out of the original color correction:

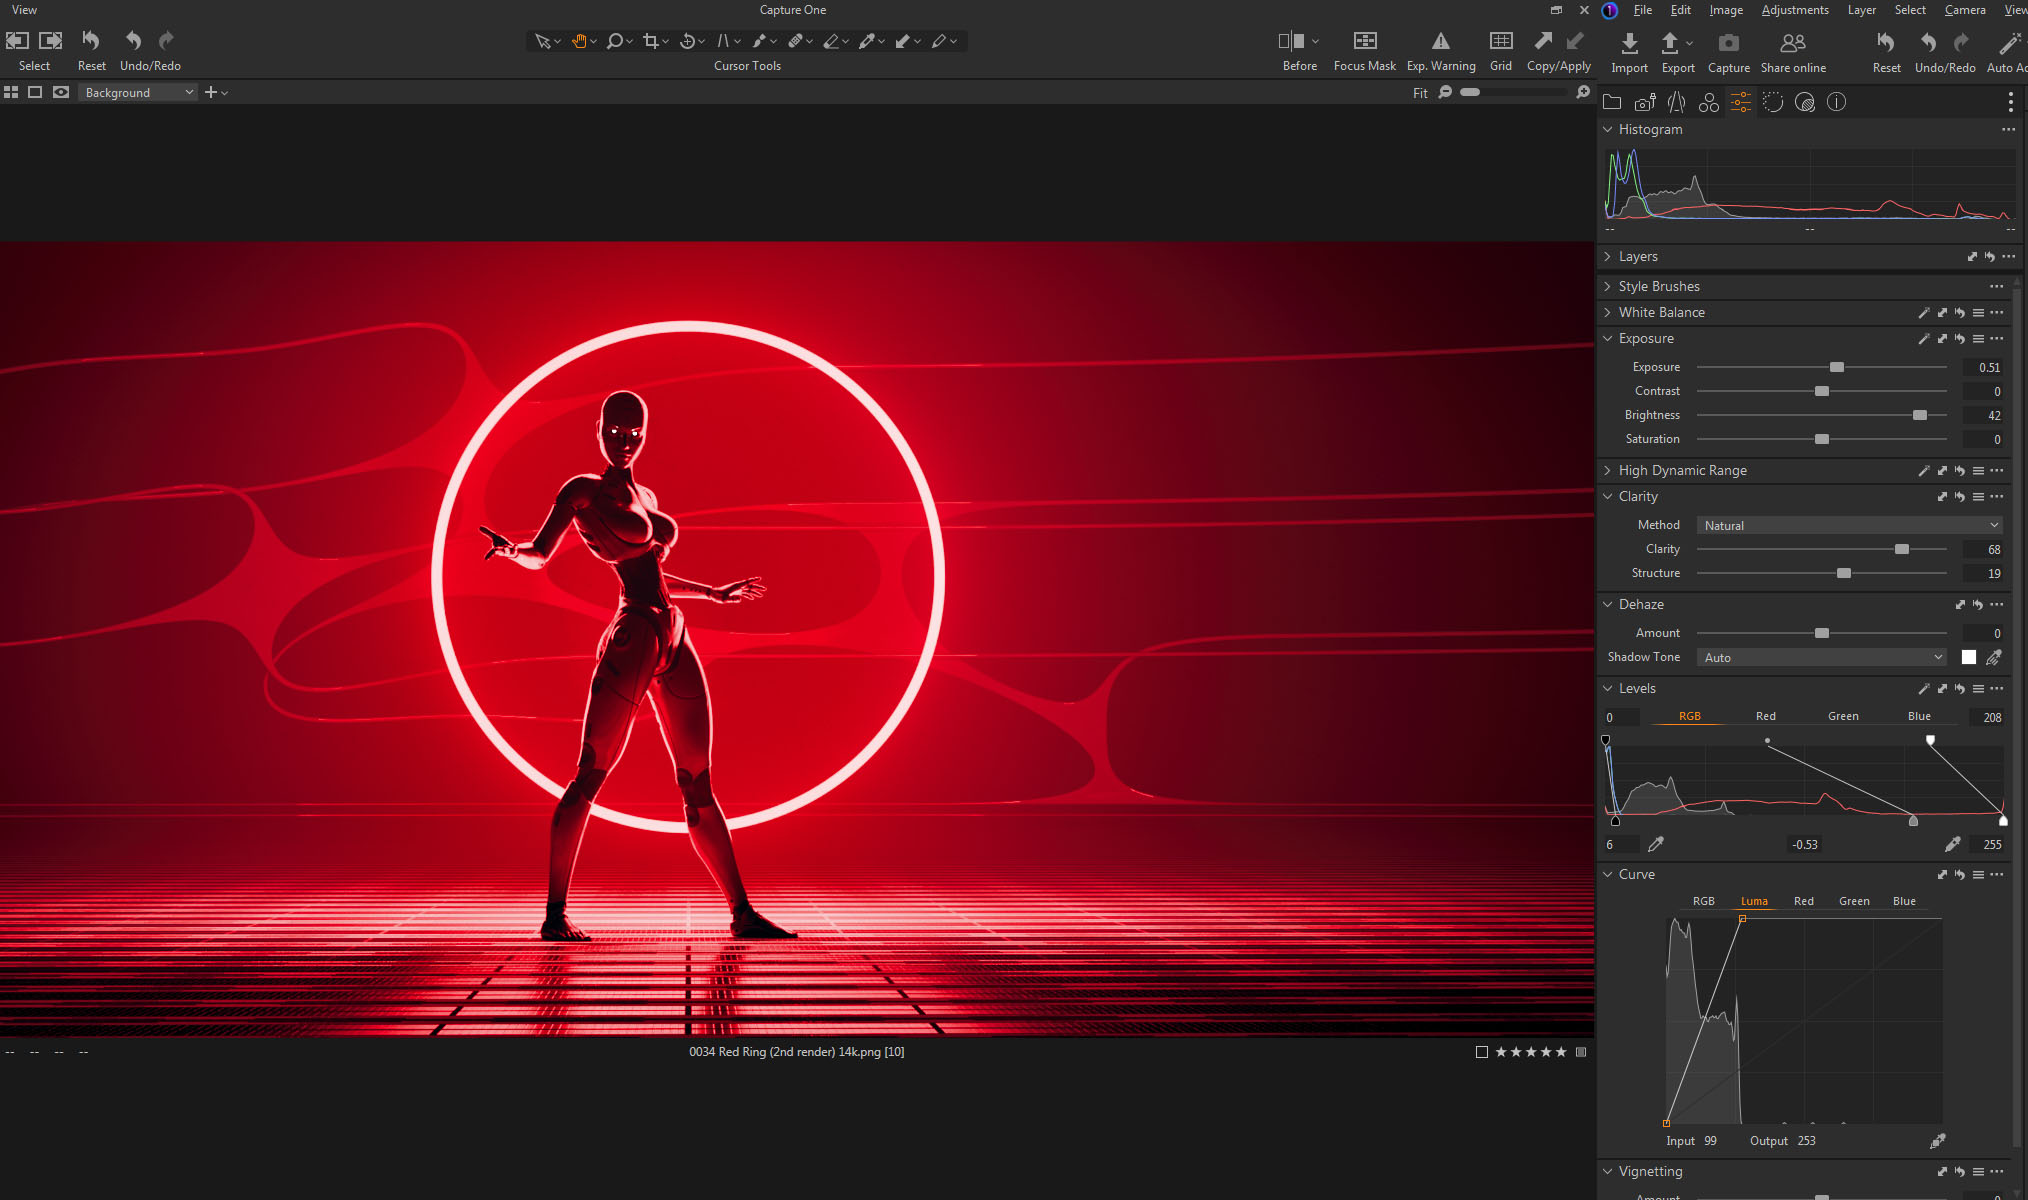
Later I went back and tried a few other things to brighten it up more.  I figured if I could get the ring to blow out (overexpose) and become white It would still look OK and be much brighter.  My color correction software, Capture One, is quite good and of course that means it doesn’t clip the high end even if you push it quite far.  I tried all sorts of crazy things, experimenting, just to see what the software could do.

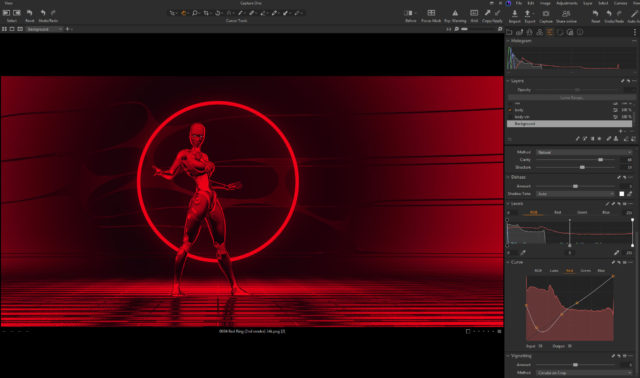
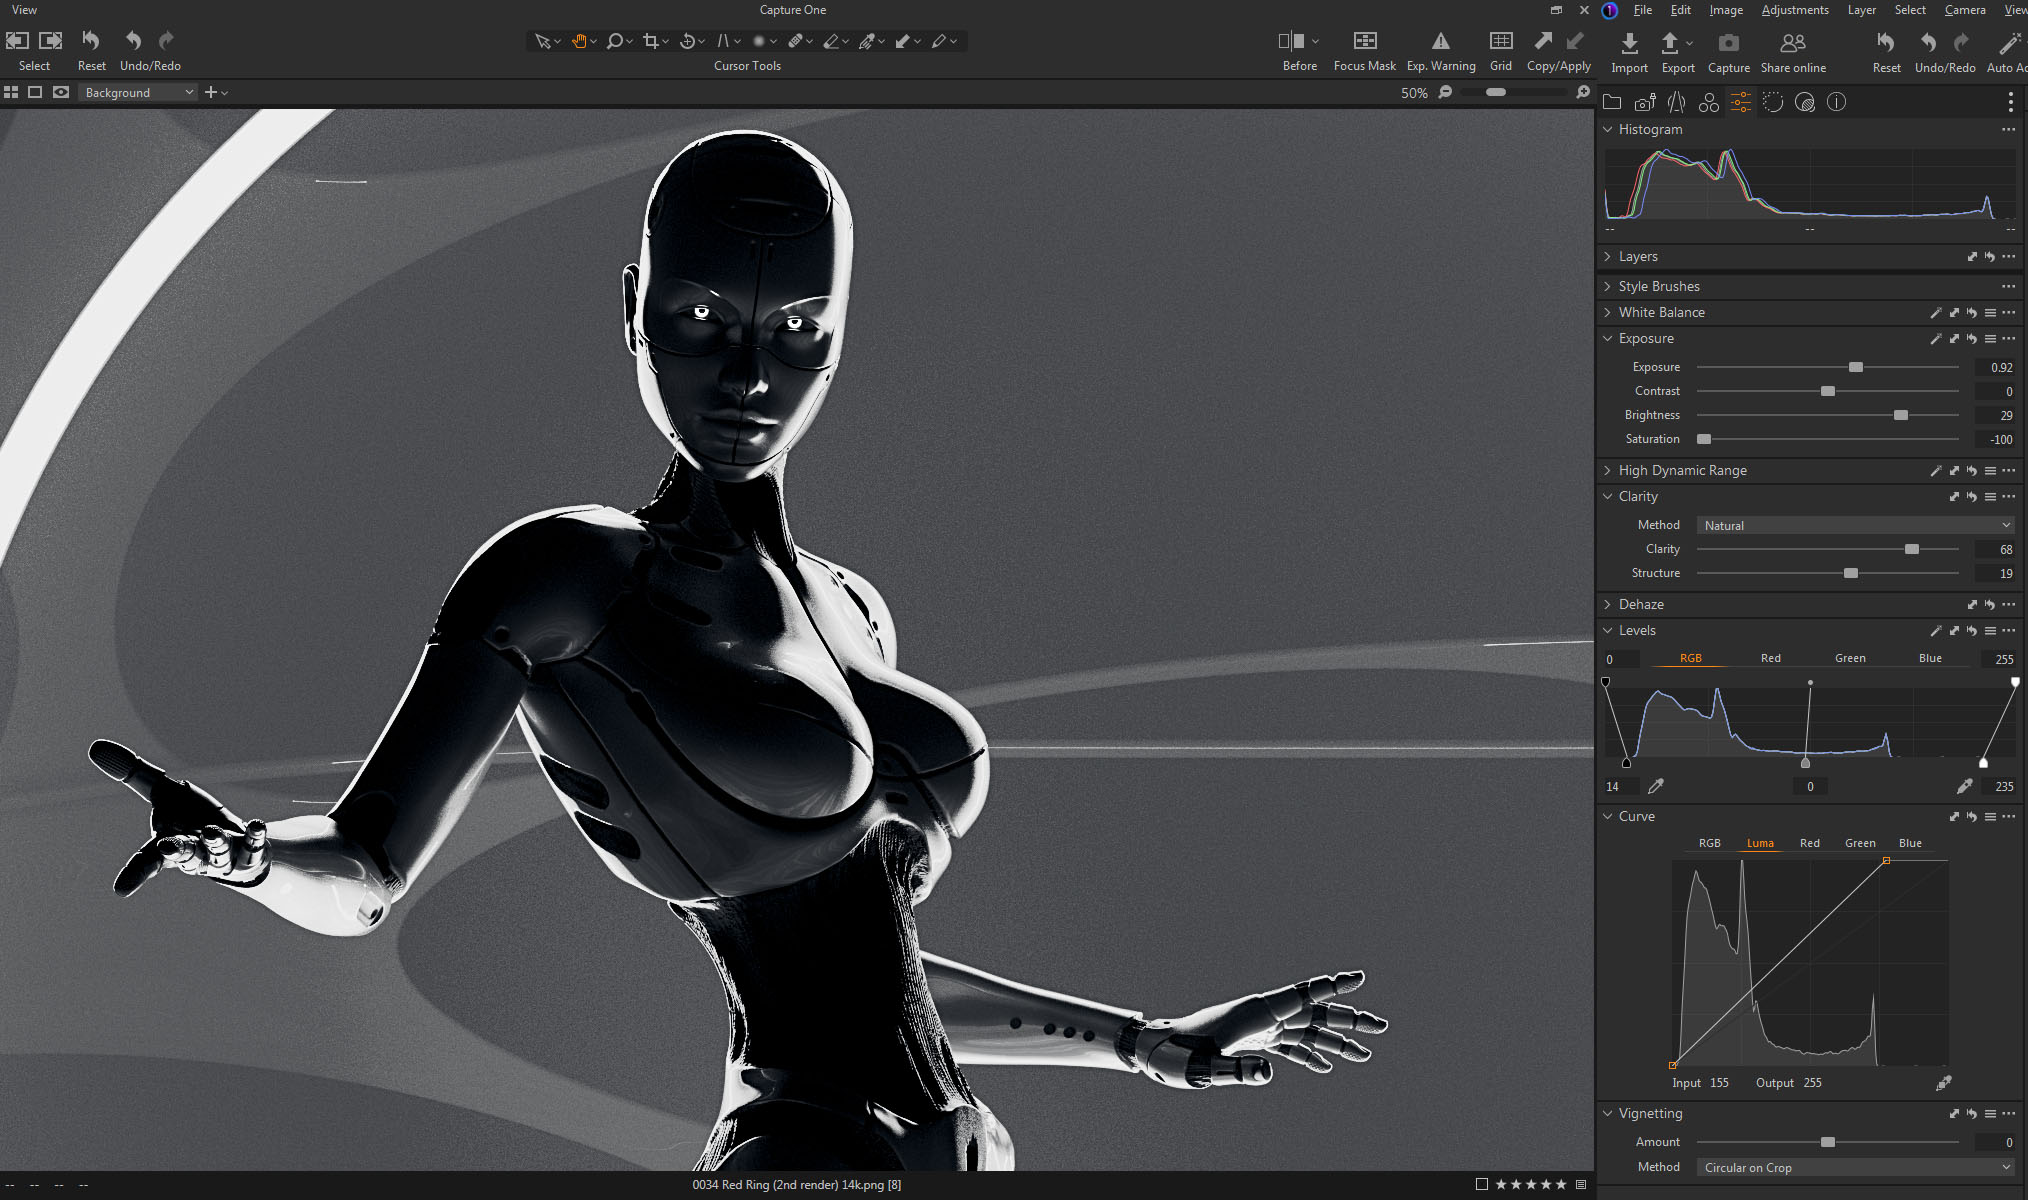
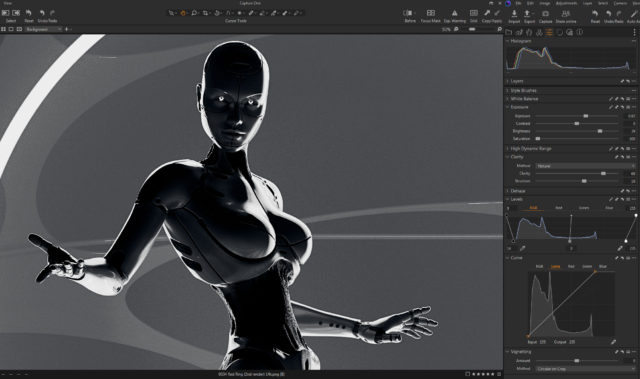
When I was screwing around with a black and white version I hit upon something…

I found that if I messed with the top end of the LUMA channel on the CURVES tool and the top end of the RGB channel on the LEVELS tool they interacted and did exactly what I wanted, blowing out the top of the red channel.  (The LUMA channel in the Curves tool somehow only adjusts contrast without changing saturation.  It’s not the same as adjusting the full RGB.)

You can see the way I set both tools at the bottom of this screenshot:

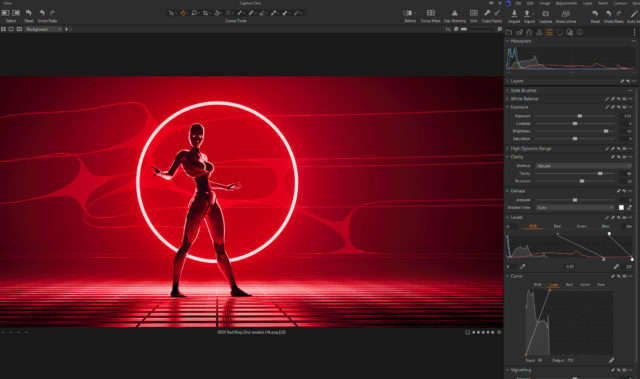
This brightened up the entire image quite a bit and It’s how I created the final color correction.

Created in DAZ Studio 4.21
Rendered with Iray
Color Correction in Capture One